
Software Development: Dockerize Python GUI Apps
Last week I have had an issue with my Epson Printer. Epson L355, one of the oldest ink tank printers (maybe one of the first as I remember), and now it was its time to maintain it..
For this I am going to write a different post to inform you how to avoid paying for a service to Epson in case you have one of these models 🙂
Python GUI Apps
GUI Apps are those ones which have a GUI (Graphical user interface). While in general it is quite straightforward to dockerize whatever app you want, when UI is mentioned, then things are complicated XD
As UI is directly connected with your system (and how every OS knows to represent it), to just dockerize an GUI app without UI representation is not gonna work.
Docker images are mostly with non UI representation, and you can access your image (App) only through SSH.

Why Dockerize it?
Well, my argument here is relied on the fact that everything changes. While today you have a python app that works on your machine, tomorrow it might not. And this decision to dockerize an app came after I found this repository to reset my Epson printer (I will also mention it more in the post I am going to make).
One important thing for GUI apps through Docker, is that Docker is not able to open a GUI as for example a VM could.
So in order to make it happen, we will use an additional layer, libX11. libX11 is a library for the X11 Window System, which provides the fundamental X11 client-side API for interacting with the X server. It allows applications to create graphical user interfaces (GUIs) on systems that use X11 (such as Linux and UNIX-based systems).
So here you will find step by step what was needed in order to make a dockerized image to run a GUI app.
Step 1: python image
We define to get the image python:3.11-slim which includes the python version we need.
In your case, it might be different, based on the python version the code is written.
Step 2: Install system dependencies
You need to remember, the image we are gonna create is another OS. So, it needs some tools and dependencies to be installed in order to fully operate as we would like to.
The lines 5-22 install all the important dependencies. Lines 9-16 are important for the GUI of the image.
Finally line 22 && rm -rf /var/lib/apt/lists/* removes the cached package lists stored in /var/lib/apt/lists/. This helps to reduce the image size and remove any redundant files.
Step 3: Install App Dependencies
This is the easiest part. We set up which dependencies we need in order to be able to run our app.
Lines 33-42 could also be removed and put all your dependencies to a requirements.txt file, and then be replaced by pip install -r /path/to/requirements.txt
Dockerfile

Step 4: Create directories and more
We set our working directory /app (line 25), and we copy everything we need there (line 28).
In between the lines 27 & 28 create a folder .vnc in home, and then we run a command to store a default password for the vnc. We will mention more details on this later.
Step 5: Prepare the app for GUI
In this step, we run some commands in order to prepare our Image, and be ready to open it.
In line 45 we set the display on 99. Normally, on a physical machine, DISPLAY=:0 is used for the main screen. Since Docker containers don’t have a physical display, we use a virtual X server like Xvfb, which runs a virtual display on :99. This is only for your knowledge 😀
In line 47 & 48 we run a script we also created and you will find below.
Last, we set as the entrypoint of this image to be this script.
start.sh
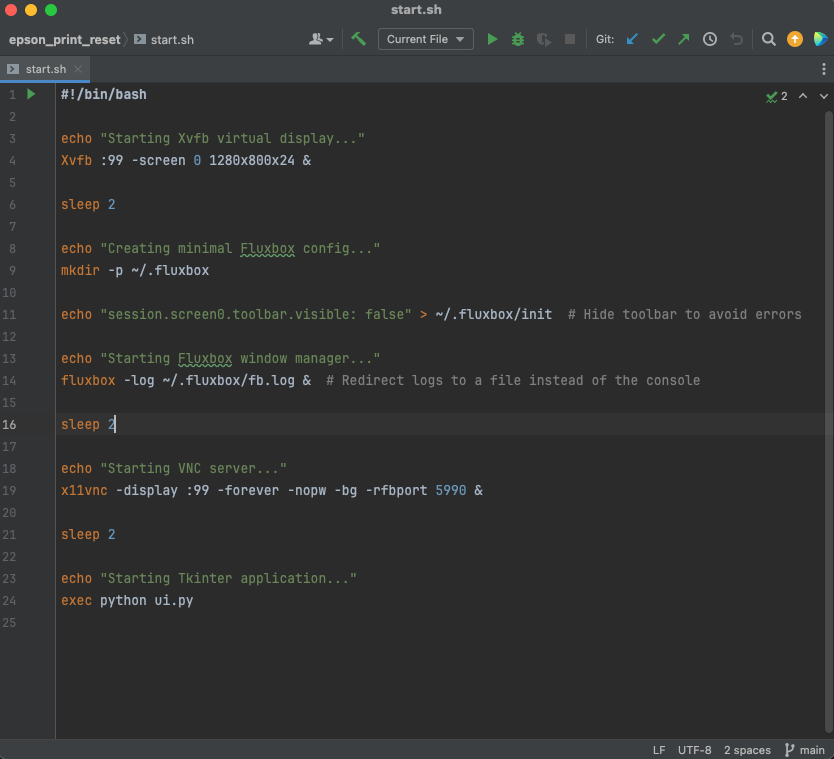
start.sh | what is it doing?
In this file I tried to also log every step to be easy for everyone.
Fluxbox is a lightweight window manager for the X11 Window System. Fluxbob is responsible to run a remote GUI application inside a Docker container with VNC.
VNC is a remote desktop sharing protocol that allows you to control a computer remotely over a network. It works by transmitting keyboard and mouse inputs from the client to the server while streaming the remote display back to the client.
Tkinter is Python’s built-in GUI library that provides tools for creating graphical user interfaces (GUIs).
Last steps to run it! (I swear!)
-
- First build your image by running:
docker build -t YOUR-APP-NAME-TAG .(You need to have your docker open 😉 ) - Run in your terminal the following to install VNC Viewer. VNC Viewer is a tool to connect to your docker image.
brew install tigervnc-viewerThis command is only for macOS users and you need to have already installed brew. If you don’t have a mac, then go to the github repository to check the guide installation for other OS. - Run your docker image:
docker run --rm --publish 5990:5990 --env HOME=/ YOUR-PATH/YOUR-APP-NAME-TAG x11vnc -usepw -create
This command sets up the right port as the one we defined in the start.sh file. In general, VNCs are connected to port 5900. Because this port is default for many OS as remote sharing feature, we define it to a different than 5900. - Open your VNC viewer
For those with macOS, open the TigerVNC viewer, and type host: localhost, port: 5990 and click Connect.
You now should be able to see your app running!
- First build your image by running:

I hope that you liked this article! If you have any question or anything you might want to mention, feel free to contact me!
Talk to you soon! Till then bye!! 🙂